NAS with Raspberry Pi
Raspberry Pi is a handy tool A few months ago, my laptop was out of space and the number of digital devices was increasing - a smart TV, a chromecast, etc. So I thought why not have a common storage for all of them. I started googling about it and one thing blew me away - NAS. All the NASes were too expensive for me - dedicated storage at 10000. No way. So, I bought a R.Pi and thought to make it a NAS. I can reprogram it if I don’t require the NAS like when I am off to college. So, I started looking up tutorials on the net. There were a lot of them on the net and all of them looked promising but I wanted the minimal setup so I went to use the Samba. I would provide all the links below, so that you can explore on your own. I ordered my R PI and there it was in 4 days of record time. There was one problem with the tutorials on the net. They only told me that I needed to format my HDD, or any other storage device I have to use for NAS. This was unacceptable as I had nowhere to put my things. Also, as I may decommission the NAS anytime soon, it was important that my data could be read on Windows too. (File system would be changed on formatting) So, I dived deep once again. This time into working of the Samba. Turns out I only needed to provide an directory address to where I want the things to be stored. This would work great if I could just mount my NTFS drive on the R PI, and make it the area where Samba would do its NAS magic. Okay, so let’s do it then. Power up your Raspberry Pi and plug in your storage device into one of the USB ports. Now, first of all join your Raspberry Pi onto the same network your laptop is on. We don’t need a screen for the PI as we would be handling all the communication via the SSH. Before proceeding forward, make sure you have your RPI updated via these 2 commands. Once you are connected to the RPI remotely, type in the following command. This will list out all the disks on the RPI. Look for a /dev/sda1 on the end of the printout. This is your storage device. Now, according to the tutorials we would format it and change it such that the R Pi can read it. But we are not here to do that. I will be proceeding with a NTFS specific way, but one can also do the same way for the other systems, We would install a ntfs reader (ntfs-3g) onto the R PI. This will make the RPI read the NTFS pen drive I am using. After it is installed, one can mount any NTFS drive onto the R PI, so that one can read and write data to it. To mount it use the following command. Here, the first argument is from the fdisk command that we ran. I had /dev/sda1 as the device and I wanted to show the device at We need to mount the drive every time we boot up the Pi - you won’t be running it 24/7 now, would you? But, we can automate this process. As it doesn’t affect on the tutorial, we are proceeding with the NAS. Now, let’s install and setup samba - not the dance, the server handler. Install it via these commands. The installer will ask you if you want to modify smb.conf to use WINS settings from DHCP. Choose Yes and press Enter. And boom, you have samba installed. I love using the apt command for installing. It’s just so simple. Now, I hope you know how to use nano, if not check that out here. Now, we will edit the samba config file to share our drive. Add the following lines at the end of the file. What this will do is create a folder on the network named NAS Drive (feel free to change). This folder would be accessible by all of the people on the local network. That looks a little bit insecure, doesn’t it. So let’s add a password. This command then asks for a password (and then a confirmation) and sets it for the user = pi. This doesn’t have to be the same one you have for accessing the sudo privileges, but it can be. One can create users and give them their own samba passwords so, that one can control which user control what - look that up in the samba documentation or google. Finally, let’s restart the samba server to finalize changes. Great! Your own NAS is up and running now. One can access the NAS, depending on the OS he/she is on. I have just made a basic NAS and none of the optimisations till now. Now, once you confirm that the NAS is running, its time to add a few changes I promised in the above tutorial. This is fairly simple - one can simply mount the drive on boot. To do this we need to edit the fstab file. Let’s open it up in nano: Add the following line at the end of the file and before the comments: This makes my file like, The pseudocode for that would look like, Here, storage name is the one you used when you were mounting the drive. Now, as for the UUID, open up another ssh shell, and type: There will be a lot of devices there. Copy the UUID from the one which has the same partition name as your storage device. Save and close the fstab file. Now, you can shut down your R PI when you don’t need it and just boot it back up when you do. In this tutorial we have set up our own home made NAS. NAS: NTFS:Introduction
What is NAS?
How to do it
sudo apt update
sudo apt upgrade
Checking disk partitions in RPI
sudo fdisk -l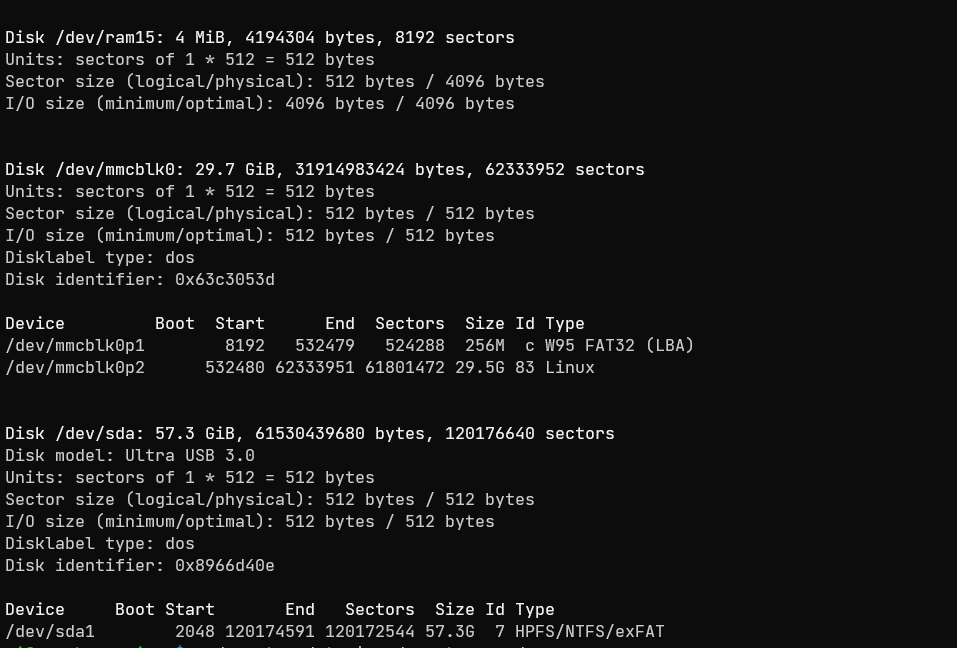
sudo apt install ntfs-3gsudo mount /dev/sda1 /mnt/NAS_Diskmnt/<disk name>. Here, replace disk name with any other name. like I have used NAS_Disk.Installing Samba
sudo apt install samba samba-commonsudo vim /etc/samba/smb.conf[NAS Drive]
path = /mnt/NAS_Disk
writeable = yes
create mask = 0777
directory mask = 0777
public = yes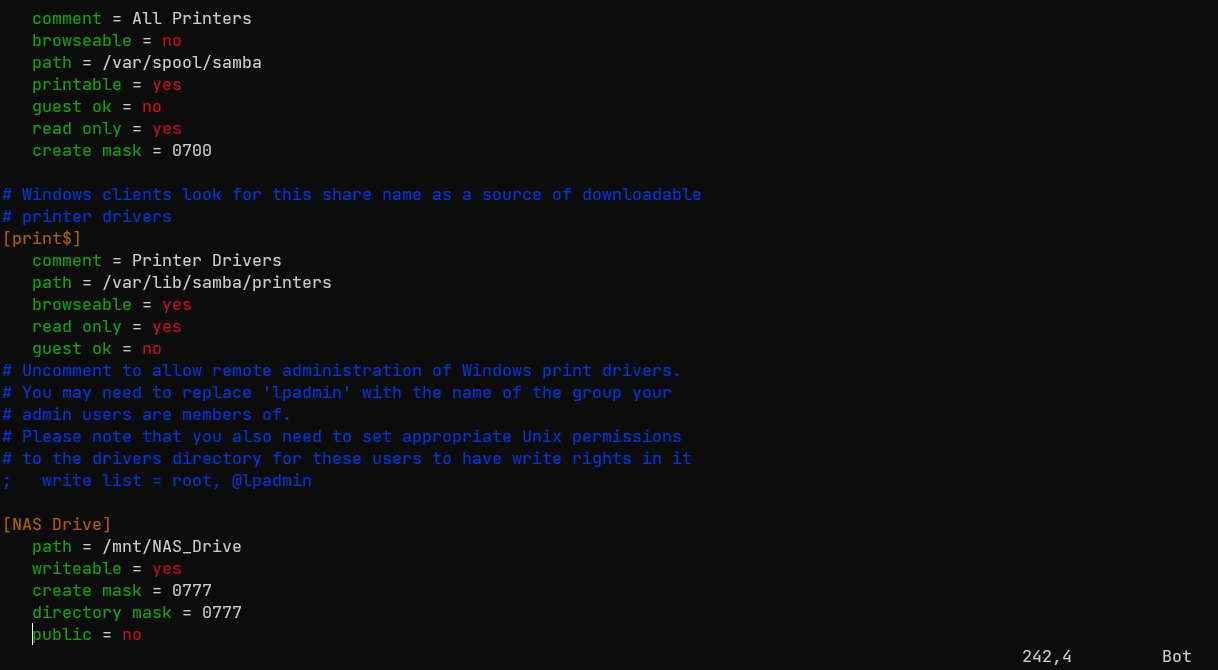
sudo smbpasswd -a pisudo systemctl restart smbdAccessing the NAS
Automatic Mounting of drive
sudo nano /etc/fstabUUID=8E3AA8FC3AA8E287 /mnt/NAS_Disk ntfs-3g defaults,auto,users,rw,nofail,umask=000 0 0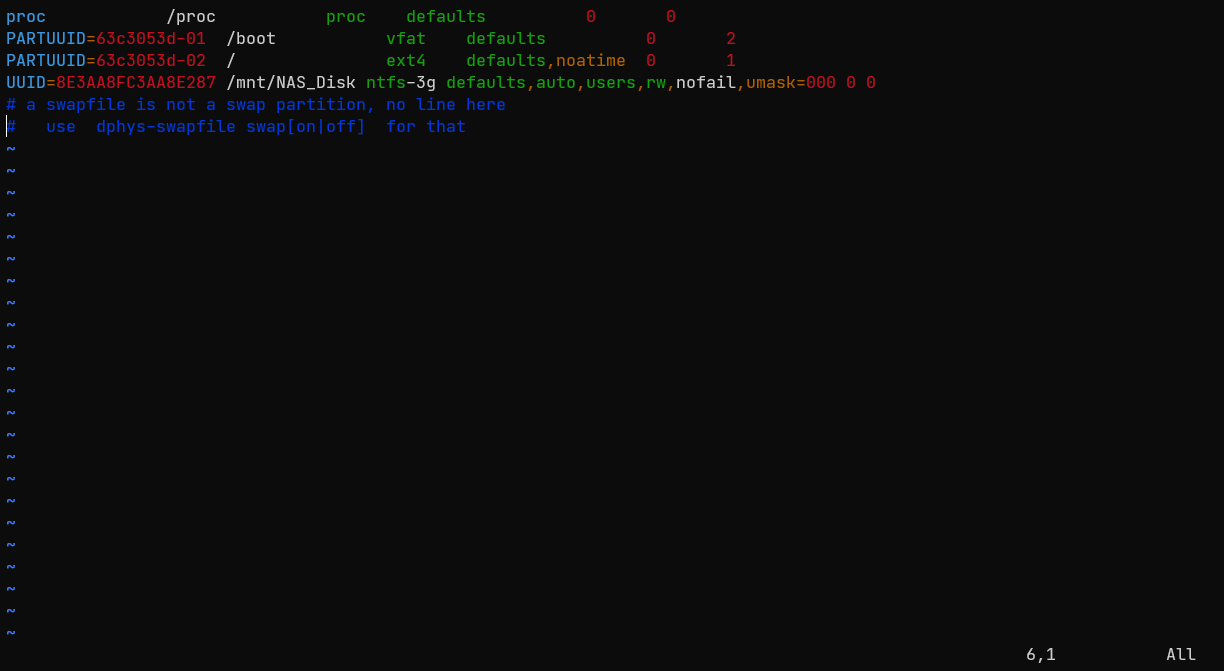
UUID= <UUID for drive name defaults,auto,users,rw,nofail,umask=000 0 0 >/mnt/ <storage >ntfs-3gsudo blkid
Conclusion
Warnings:
References
Copied! Copy code to clipboard